So far, we have flashed MicroPython firmware onto an ESP8266 and setup WebREPL to run programs over WIFI on the chip. Now it's time for a hands-on excercise. We'll remotely switch on/off and control brightness of an LED using MicroPython WebREPL.
1. Prerequisite
This post is continuation of my earlier posts
- How to flash MicroPython firmware onto an ESP8266 ESP-12E chip using esptool?
- How to setup WebREPL to connect to Python prompt (REPL) of ESP8266 over WIFI network?
Note: To simplify, we'll only make a minor change in the earlier circuit. USB to Serial converter and few components may look redundant at this moment. Still, we'll keep everything as it is, as much as possible, for the time being. Coding in WebREPL console may not be convenient enough. Therefore, from the next post onwards, we'll use an IDE (e.g. ESPlorer).
2. Build the Circuit
Connect an LED to a GPIO pin (e.g. GPIO12) using one resistor in series. Rest of the circuit will remain as it is.
Circuit Diagram

Circuit Design using Breadboard

3. Connect to WebREPL
Connect your computer to the WIFI access point of ESP8266. Open webrepl.html using Chrome or Firefox browser. Provide WebREPL url and connect.

Welcome to MicroPython!
Password:
WebREPL connected
>>>
How to enable Paste Mode?
To enable paste mode, press Ctrl & E. Then paste a chuck of code. To finish pasting code and start execution of the same, press Ctrl & D
WebREPL connected
>>>
paste mode; Ctrl-C to cancel, Ctrl-D to finish
===
4. Example-1: Control Switch on/off of an LED
a. Import Pin class from machine module.
from machine import Pin
b. Setup a GPIO Pin (e.g. GPIO12) for output.
myLed = Pin(12, Pin.OUT)
c. To switch on the LED, call high() or value(1) function.
myLed.high()

d. To switch it off, call low() or value(0) function.
myLed.low()

Sample Code:
from machine import Pin

#Setup a GPIO pin for output
myLed = Pin(12, Pin.OUT)

myLed.high()
myLed.low()
Note: Use help() function to get more details about any class as shown below.
>>> from machine import Pin
>>> help(Pin)
object <class 'Pin'> is of type type
  init -- <function>
  value -- <function>
  low -- <function>
  high -- <function>
  irq -- <function>
  IN -- 0
  OUT -- 1
  OPEN_DRAIN -- 2
  PULL_UP -- 1
  IRQ_RISING -- 1
  IRQ_FALLING -- 2
Demo:
5. Example-2: Blinking an LED
We'll programmatically switch on and off an LED to make it blink/flash. We can do this in different ways as below.
We'll start with simple approach first by running a for loop to switch on/off the LED 10 times with half second pause (sleep) in between.
from machine import Pin
import time

#Setup a GPIO pin for output
myLed = Pin(12, Pin.OUT)

for i in range (10):
    #Toggle the value
    myLed.value(not myLed.value())
    #Pause
    time.sleep_ms(500)
Demo:
Next, we'll use Timer class and it's callback handler to blink an LED.
from machine import Timer, Pin
import time

#Define a function to blink a LED
def blink(led):
     led.value(not led.value())

#Setup a GPIO pin for output
myLed = Pin(12, Pin.OUT)
#Construct a virtual (id=-1) timer
blinkTimer = Timer(-1)
#Setup the timer to call the custom blink function at a regular interval of 0.5 second
blinkTimer.init(period=500, mode=Timer.PERIODIC, callback=lambda t:blink(myLed))
#Wait
time.sleep_ms(10000)
#Switch off the LED
myLed.low()
#deinitialize/stop the timer
blinkTimer.deinit()
Demo:
Lastly, we'll use PWM (Pulse Width Modulation) class and it's callback handler to blink an LED.
from machine import Pin, PWM

#Setup a GPIO pin for output
myLed = Pin(12, Pin.OUT)

#50% duty cycle. 0.5 second on and 0.5 second off
pwm = PWM(myLed, freq=1, duty=512)
#Wait
time.sleep_ms(10000)
#Switch off the LED
myLed.low()
#deinitialize/stop the timer
pwm.deinit()
What is Pulse Width Modulation (PWM)?
Pulse Width Modulation, or PWM, is a technique for getting analog results with digital means. Digital control is used to create a square wave, a signal switched between on and off. This on-off pattern can simulate voltages in between full on and off by changing the portion of the time the signal spends on versus the time that the signal spends off. more details
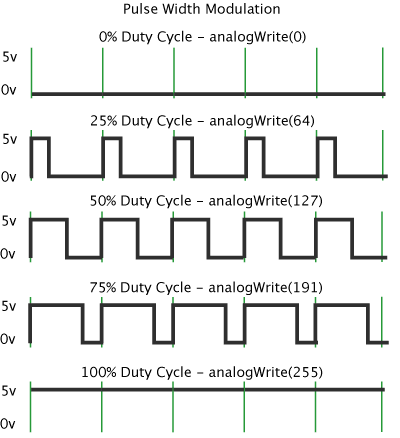
Note (ESP8266):
PWM can be enabled on all pins except Pin(16). There is a single frequency for all channels, with range between 1 and 1000 (measured in Hz). The duty cycle is between 0 and 1023 inclusive.
Demo:
6. Example-3: Control brightness of an LED
By manipulating duty cycle, we can control the power supplied to LED, resulting the change in brightness. The value of duty cycle can be between 0 and 1023 inclusive.
import time
from machine import Pin, PWM

#Define a function to change duty cycle
def brightness(pwmLed, percentage):
     #Value of duty cycle is between 0 and 1023 inclusive.
     pwmLed.duty(int (percentage * 1023 / 100));

# Setup a GPIO Pin for output
myLed = Pin(12, Pin.OUT)
#Instantiate a PWM object
myLedPwm = PWM(myLed)

#Full brightness - 100% duty cycle
brightness(myLedPwm, 100)
#pause
time.sleep_ms(2000)

#Half brightness - 50% duty cycle
brightness(myLedPwm, 50)
#pause
time.sleep_ms(2000)

#One third brightness - 33% duty cycle
brightness(myLedPwm, 33)
#pause
time.sleep_ms(2000)

#deinitialize/stop the PWM
myLedPwm.deinit()
Demo:
7. Example-4: Fade-in/Fade-out LED
We'll programmatically change (e.g. delta in our example) the duty cycle from 100% to 0% and 0% to 100% in a for loop. We'll repeat this in another loop to get a nicer fade in and out effect few times.
import time
from machine import Pin, PWM

#Define a function to change duty cycle
def brightness(pwmLed, percentage):
     #The duty cycle is between 0 and 1023 inclusive.
     pwmLed.duty(int (percentage * 1023 / 100));

# Setup a GPIO Pin for output
myLed = Pin(12, Pin.OUT)
#Instantiate a PWM object
myLedPwm = PWM(myLed)


percentageVal = 100
delta = 5

for i in range(10):
    for j in range(20):
        brightness(myLedPwm, percentageVal)

        if percentageVal >= 100 or percentageVal <=0 :
            delta = -1 * delta

        percentageVal = percentageVal + delta
        time.sleep_ms(50)

#deinitialize/stop the PWM
myLedPwm.deinit()
Demo:



Comments